Powered by Blogger.

Sunday, 19 January 2025

Step-by-step outdoor storage shed construction guide


Building Your Dream Outdoor Shed: A Step-by-Step Guide

Constructing your own outdoor storage shed is a rewarding project that combines planning, skill, and hard work. This guide walks you through each stage, equipping you with the knowledge to build a sturdy and functional shed tailored to your needs. Remember safety first â€" always wear appropriate safety gear, including gloves, safety glasses, and sturdy work boots.

Phase 1: Planning and Preparation

Before you even touch a tool, meticulous planning is crucial. Begin by determining the shed's purpose. What will you store? This dictates size and features. Next, sketch a detailed design, including dimensions, door placement, and window placement (if desired). Consider local building codes â€" you may need permits before you start. Secure the necessary materials; a detailed list, generated from your design, will ensure you have everything on hand. This includes lumber (pressure-treated is ideal for longevity), roofing materials, fasteners (screws are generally preferred over nails), and any additional features like windows or shelving.

Choosing the Right Location

Select a level, well-drained location. Consider sun exposure and proximity to utilities and access points. Mark the shed’s footprint clearly and check for underground utilities before digging.

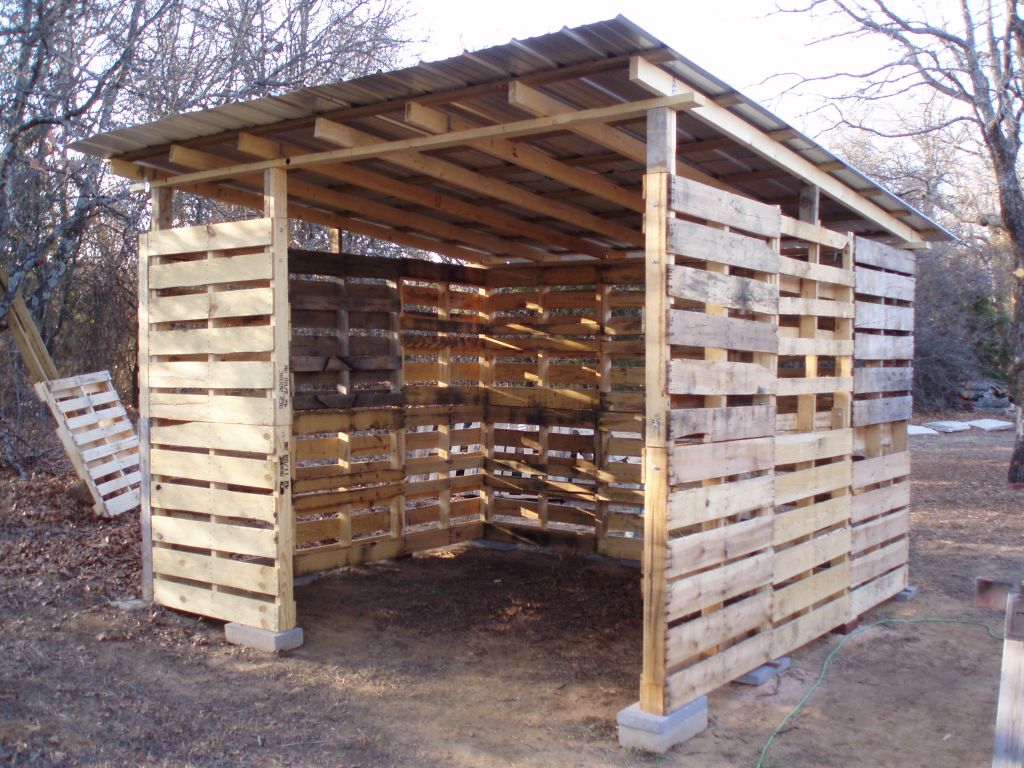
Phase 2: Foundation and Framing

A solid foundation is essential for stability. For smaller sheds, a concrete slab provides a robust base. For larger structures or those on uneven ground, consider a pier and beam foundation. Begin by excavating the area to the required depth. For a concrete slab, pour and level the concrete according to the manufacturer’s instructions. Let it cure completely before proceeding. For a pier and beam foundation, set concrete piers in the ground at the corners and along the sides, ensuring they are level and plumb. Then build the frame using pressure-treated lumber, creating a sturdy rectangular structure. Double-check all measurements and ensure the frame is square at each stage using a level and measuring tape. Remember to anchor the frame to the foundation securely.

Framing Techniques

Use strong, pressure-treated lumber for the base framing. Employ proper joinery techniques, such as using screws and metal brackets to ensure strength and rigidity. Construct the walls using a similar framework, ensuring all members are properly aligned and fastened.

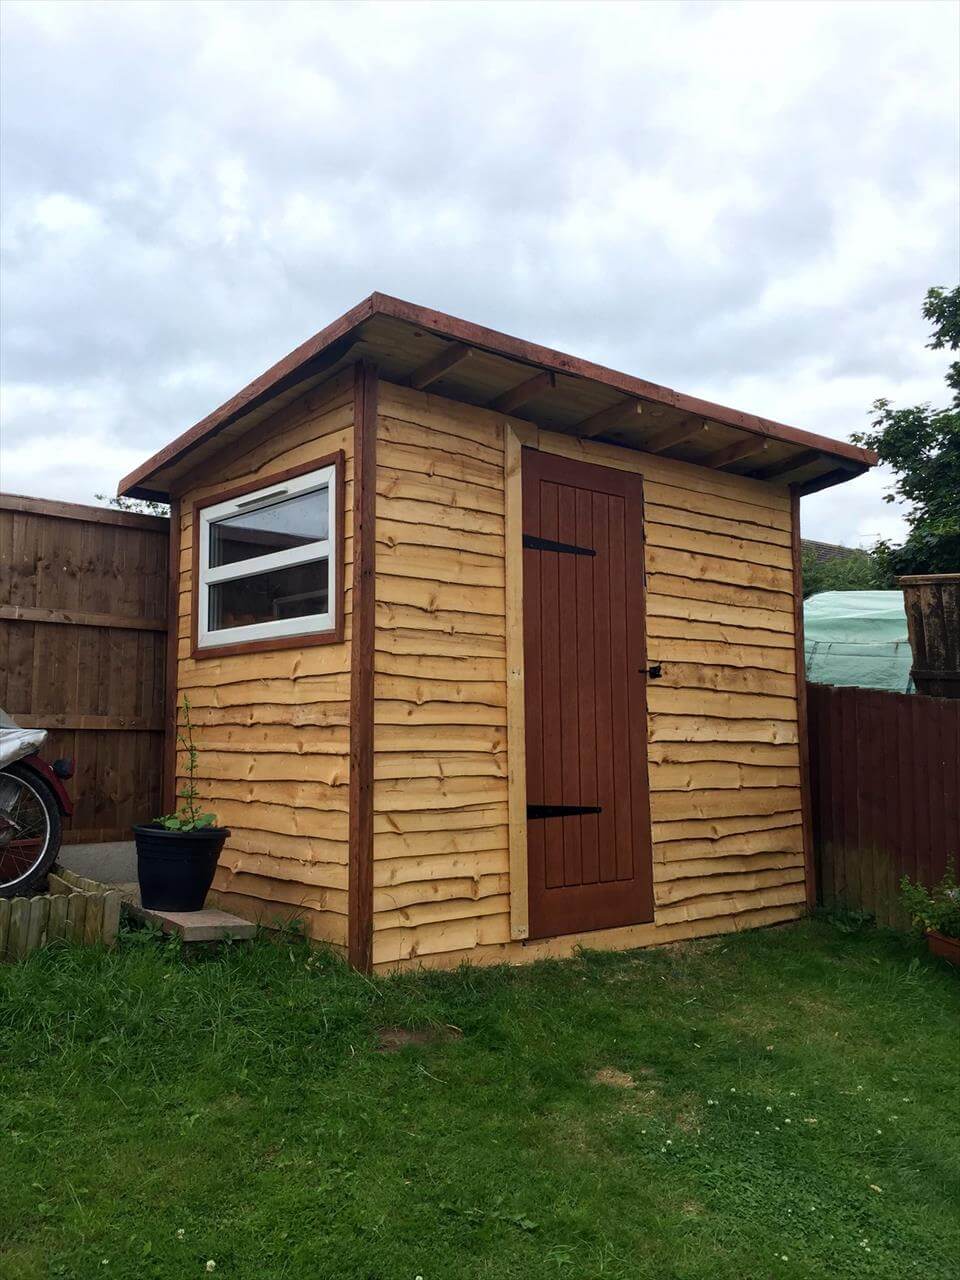
Phase 3: Roofing and Siding

Once the frame is complete, it's time to add the roof. The roof type depends on your design â€" gable roofs are common for sheds due to their simplicity and effectiveness at shedding water. Install the rafters according to your plan and secure them firmly to the top plates. Apply roofing felt or underlayment before installing the chosen roofing material (asphalt shingles are a popular and cost-effective choice). Ensure proper overhang to protect the walls from rain. Next, install the siding. Choose a material that suits your aesthetic preferences and budget â€" vinyl siding is easy to install and low maintenance, while wood siding offers a more natural look.

Phase 4: Doors, Windows and Finishing Touches

Install the door(s) and windows, ensuring they are securely fastened and operate smoothly. Use appropriate hinges and handles. Once the exterior is complete, add finishing touches. This could include painting or staining the exterior for protection and aesthetics. Install interior shelving or other storage solutions based on your initial plan. A final cleaning will leave your new shed looking its best.

Adding Personal Touches

Consider adding features like vents for better airflow, or even electrical outlets for added convenience (ensure this complies with electrical codes). Personalize your shed to reflect your style and needs.

Phase 5: Final Inspection and Enjoyment

Congratulations! Your new outdoor shed is complete. Perform a final inspection, checking for any loose screws, gaps, or other issues. Address any problems promptly. Now, enjoy the fruits of your labor â€" a customized storage solution perfectly suited to your needs. Remember to maintain your shed regularly to ensure its longevity.

DIY shed construction for absolute novices


Building Your Dream Shed: A Beginner's Guide

So, you're thinking about building a shed? Fantastic! It's a hugely rewarding project, even if you've never picked up a hammer before. This guide is designed for absolute beginners â€" think "I can barely change a lightbulb" level of experience. We'll walk through everything step-by-step, making sure you feel confident every inch of the way. Grab a cuppa, get comfy, and let's get started!

Planning Your Shed Masterpiece

Before you even think about touching a single nail, you need a plan. This isn't about architectural drawings (unless you're feeling ambitious!), but more about figuring out the basics.

1. Size and Location:

How big do you need your shed to be? Consider what you'll be storing. A small 4x6ft shed is perfect for garden tools, while a larger 8x10ft shed might accommodate bikes, lawnmowers, and more. Think about the location too. Do you have a level, accessible area? Is it near a power source if you need electricity? Check local building regulations â€" you might need planning permission depending on size and location.

2. Shed Design:

There are tons of shed designs available online and in home improvement stores. You can buy pre-cut kits, which simplify the process massively, or opt for a more custom build from scratch (which is a bit more challenging for beginners). For your first shed, a simple design is your best bet. Avoid overly complex rooflines or fancy features.

3. Materials List:

This is crucial. Once you've chosen your design, create a detailed list of every single material you'll need. Don't forget the small stuff â€" screws, nails, hinges, etc. Most shed kits come with a materials list, making this easier. If building from scratch, check several times to ensure you have everything before you start. Trust me, running to the hardware store in the middle of the project is frustrating!

4. Tools of the Trade:

You won't need an arsenal of power tools for a basic shed. Here's a good starting point:

  • Measuring tape
  • Level
  • Hammer
  • Screwdriver (Phillips and flathead)
  • Shovel (for digging)
  • Post hole digger (optional, but makes digging easier)
  • Safety glasses
  • Work gloves

You might want to rent a post hole digger and/or a circular saw if you aren't building from a kit.

Getting Your Hands Dirty: Construction Time!

This is where the fun begins (well, maybe after the planning!). Remember to take your time, and don't be afraid to ask for help if you get stuck.

1. Preparing the Ground:

This involves leveling the ground where your shed will sit. Use a shovel to remove any grass, weeds, and loose soil. You might need to add or remove soil to achieve a perfectly level base. A slight slope away from the shed is good for drainage.

2. Building the Base:

This depends on your chosen foundation. Concrete is the most durable but also the most demanding. A gravel base is a simpler, budget-friendly alternative. For a gravel base, dig out a shallow pit slightly larger than your shed's footprint, lay down weed barrier fabric, then add a layer of compacted gravel. This provides a stable, level surface.

3. Assembling the Shed Frame:

If you’ve bought a kit, follow the instructions carefully. It'll usually involve assembling the walls and roof separately before joining them. If building from scratch, you'll need to create the wall frames using pre-cut lumber and secure them using appropriate connectors or screws. Ensure the frame is square and plumb (perfectly vertical and level).

4. Adding the Roof:

Roof construction varies by design, but generally, it involves attaching rafters to the top of the walls and covering them with roofing felt or shingles. This can be a little tricky, so take your time and follow your chosen instructions meticulously.

5. Siding and Finishing Touches:

Once the frame and roof are complete, it’s time for the siding. This is the exterior cladding of your shed. Again, your kit (if applicable) will guide you. Finally, add a door, windows, and any other finishing touches you desire.

Troubleshooting and Tips for Success

Building a shed is a learning process. Don't get discouraged if things don't go perfectly smoothly. Here are a few helpful hints:

  • Measure twice, cut once: This age-old adage is crucial, especially for beginners. Accuracy is key.
  • Use a level constantly: Ensure everything is perfectly plumb and level as you go; this prevents problems down the line.
  • Don't rush: Take breaks when needed. A rushed job often results in mistakes.
  • Ask for help: Don't hesitate to ask a friend or family member for assistance, especially with heavier tasks.
  • Check your work regularly: Before moving to the next stage, step back and assess your work for any errors.

Commonly Asked Questions

Here are some questions that often pop up from newbie shed builders:

  • Q: Do I need planning permission? A: This depends on your location and the size of your shed. Check your local council's website or contact them directly.
  • Q: How long will it take to build a shed? A: This depends on the size and complexity, as well as your experience. A simple shed can be built in a weekend, while a more complex one could take several.
  • Q: What's the best type of wood to use? A: Pressure-treated lumber is ideal for outdoor projects as it's resistant to rot and insects.
  • Q: Can I build a shed by myself? A: While possible for smaller, simpler sheds, having a helper is always recommended, especially for lifting and positioning heavier materials.
  • Q: What if I make a mistake? A: Don't panic! Many mistakes are fixable. Take a deep breath, assess the situation, and try to find a solution. If you're really stuck, seek advice from experienced builders.

Building your own shed is an incredibly rewarding experience. It's a chance to learn new skills, create something tangible, and enjoy the fruits of your labor. So, get out there, follow these steps, and enjoy the process!

Build a functional shed with loft as a beginner


Building Your Dream Shed with Loft: A Beginner's Guide

So, you're dreaming of a beautiful, functional shed â€" maybe even one with a loft? That's awesome! Building a shed might seem intimidating at first, but trust me, it's totally doable, even for a beginner. This guide will walk you through the process, step by step, in a way that's easy to understand. We’ll tackle building a shed with a loft, focusing on making it a manageable project for your first DIY endeavor.

Planning Your Shed Masterpiece

Before you even think about grabbing a hammer, you need a solid plan. This isn't just about throwing some wood together; we're talking about creating a structure that's both aesthetically pleasing and structurally sound. Let's break it down:

Size and Location, Location, Location!

How big do you need your shed to be? Consider what you'll be storing. A smaller shed might suffice for lawn equipment, while a larger one is better for storing bikes, kayaks, or even a small workshop. Remember to factor in the loft space! As for location, choose a level spot with easy access. Check your local building codes â€" some areas have restrictions on shed size and placement.

Design and Materials: Getting Your Hands Dirty (with Planning)

This is where things get exciting! You can find countless shed plans online â€" some free, some paid. Don't be afraid to adapt a plan to your needs and available materials. Consider the style you want â€" rustic, modern, traditional? Then, think about the materials. Pressure-treated lumber is a popular choice for its durability and resistance to rot. For the roof, you could go with asphalt shingles, metal roofing, or even corrugated plastic.

Pro-tip: Create a detailed materials list. This will save you headaches and trips to the hardware store!

Tools of the Trade: Gathering Your Arsenal

You'll need a basic set of tools. Don't feel pressured to buy everything at once. You might be able to borrow some tools from friends or family. Here's a starting point:

  • Measuring tape
  • Level
  • Shovel
  • Post hole digger (or a strong friend!)
  • Hammer
  • Saw (circular saw is helpful, but a handsaw works too)
  • Drill
  • Screwdriver bits (various sizes)
  • Safety glasses
  • Work gloves

This list will likely grow as your project progresses. It's important to buy high-quality tools which may increase the initial cost but will save you a lot in the long run.

Construction: The Fun Begins!

With your plans and materials ready, it's time to build! This is where having a detailed plan really pays off. Take your time, follow the instructions carefully, and don't be afraid to ask for help if you get stuck.

Foundation: A Solid Base

Your shed needs a stable foundation. For a small shed, a concrete slab is a great option. If you're not comfortable pouring concrete, you can use pressure-treated lumber to create a base frame. Ensure your base is level â€" this is crucial for a structurally sound shed.

Framing: Building the Skeleton

This is where the bulk of the construction happens. Follow your plans meticulously. Square up your frame carefully, using your level to ensure everything is plumb and square. Pre-drill holes before driving screws to prevent the wood from splitting.

Sheathing: Adding the Skin

Once the frame is complete, it's time to add the sheathing â€" usually plywood or OSB (oriented strand board). This will provide a solid surface for your siding and will help to maintain the structural integrity of your shed. Make sure all of the pieces are firmly secured.

Roofing: Protecting Your Investment

The roof is an important part of protecting your shed and its contents. Carefully follow the instructions for your chosen roofing material. Make sure it is securely fastened to withstand wind and rain. Consider adding a drip edge to help prevent water damage.

Siding and Trim: Adding the Finishing Touches

Now for the fun part! This is where you can really personalize your shed. Choose siding that complements your style and the surrounding landscape. Add trim to finish off the edges and create a polished look.

Loft Construction: Reaching New Heights

Building the loft adds a level of complexity, but it's achievable! Start by constructing the loft floor joists and securing them to the main frame. Then, add the floor sheathing. Remember to add support beams to the main structure to help support the added weight. You can then construct the loft walls using the same framing techniques as the main shed walls.

Doors and Windows: Access and Ventilation

Install your doors and windows. Make sure they are securely fastened and properly sealed to prevent drafts and water intrusion. If you're planning on installing a window in the loft, this is a crucial step to ensure proper ventilation.

Finishing Touches and Safety Considerations

Before you celebrate your accomplishment, take a few extra steps to ensure your shed’s longevity and safety.

Finishing Touches

Adding paint or stain will protect your shed from the elements and enhance its curb appeal. Consider weatherproofing the wood to further protect it from moisture. If you’re using metal roofing, consider adding a sealant to the seams.

Safety First!

Always wear safety glasses and work gloves. Use proper lifting techniques to avoid injury. If you're using power tools, be sure to follow all safety instructions. And, of course, never work alone on a project like this.

Frequently Asked Questions

Here are some common questions I get about building a shed with a loft.

Q: How long does it take to build a shed with a loft?

A: It depends on your experience, the size and complexity of the shed, and how much time you can dedicate to it. Expect to spend several weekends, or even a couple of weeks, if you’re tackling it in your spare time.

Q: How much does it cost to build a shed with a loft?

A: Costs vary greatly depending on size, materials, and your location. You can expect to spend anywhere from a few hundred to a few thousand dollars.

Q: Do I need a building permit?

A: This depends on your local building codes. It's best to check with your local authorities before you start building to avoid potential fines or problems down the road.

Q: Can I build a shed with a loft myself, as a beginner?

A: Absolutely! This guide is designed to help beginners. Start with a smaller, simpler shed design if you’re feeling hesitant. Take your time, follow the instructions carefully, and don't be afraid to ask for help.

Building a shed with a loft is a rewarding experience. Enjoy the process, and congratulations on your upcoming DIY adventure!

Thursday, 21 November 2024

DIY Pallet Shed: Free Plans for Creating a Practical Storage Solution


DIY Pallet Shed: Free Plans for Creating a Practical Storage Solution

DIY Pallet Shed: Free Plans for Creating a Practical Storage Solution

The allure of a cost-effective and aesthetically pleasing storage solution is undeniable. Reclaimed materials offer a sustainable and budget-friendly approach to construction, and repurposed pallets stand out as a particularly versatile option. This comprehensive guide provides detailed, free plans for constructing a practical and durable pallet shed, suitable for a range of storage needs. From initial planning to final touches, this guide ensures a successful project, even for novice DIY enthusiasts.

Phase 1: Planning and Preparation

Before embarking on the construction process, meticulous planning is crucial for a streamlined and successful project. This phase encompasses assessing your needs, selecting appropriate materials, and preparing the construction site.

Assessing Your Storage Needs

Begin by defining the purpose of your pallet shed. What will you store inside? The size and design of your shed will be directly influenced by the intended contents. Consider factors such as the volume of items to be stored, their dimensions, and any specific requirements for climate control or protection from the elements. Accurate assessment prevents costly mistakes and ensures the final structure adequately fulfills its purpose.

Material Selection and Acquisition

The foundation of your pallet shed is, of course, the pallets themselves. Source high-quality pallets; avoid those showing significant signs of damage, rot, or infestation. Inspect each pallet carefully for loose nails, broken boards, or structural weaknesses. Aim for pallets constructed from sturdy hardwood, as these offer superior durability and weather resistance. You will also require additional materials, including:

  • Foundation Materials: Concrete blocks, gravel, or a prepared level ground.
  • Roofing Materials: Corrugated metal sheeting, asphalt shingles, or tar paper, depending on your budget and aesthetic preferences.
  • Fasteners: Galvanized nails, screws, and potentially metal strapping for added structural integrity.
  • Treatment Materials (Optional): Wood preservative and sealant to enhance the longevity and weather resistance of the pallets.
  • Tools: Hammer, saw, drill, level, measuring tape, safety glasses, gloves.

Site Preparation

Choosing the appropriate location for your pallet shed is paramount. Ensure the site is level and provides adequate drainage to prevent water accumulation around the structure. Clear the area of any debris, vegetation, or obstacles that might interfere with construction. The site should also offer convenient access for material delivery and future use of the shed.

Phase 2: Construction of the Pallet Shed Frame

This phase involves assembling the primary structural components of the shed, ensuring a robust and stable foundation for the walls and roof.

Building the Foundation

Constructing a stable foundation is essential for preventing settling and ensuring the longevity of your pallet shed. You have several options: a simple gravel base for well-drained soil, a concrete slab for superior stability, or a foundation built with concrete blocks. The choice depends on your budget, soil conditions, and desired level of permanence.

Erecting the Walls

Using pre-selected and inspected pallets, begin assembling the walls of your shed. Ensure that the pallets are aligned consistently to maintain structural integrity. You may need to cut and adjust certain pallets to fit the desired dimensions of your shed. Secure the pallets together using galvanized nails or screws. Consider adding bracing or support beams to reinforce the structure, particularly if you plan on storing heavier items.

Constructing the Roof Frame

The roof design can vary depending on your preference and the overall design of the shed. A simple gable roof or a shed roof are both viable options. You can use additional lumber to create the roof frame, ensuring adequate support for the chosen roofing material. Properly securing the roof frame to the walls is critical to prevent collapses or damage during inclement weather.

Phase 3: Roofing and Finishing Touches

This phase completes the shed's construction, adding the final layers of protection and aesthetic appeal.

Installing the Roofing Material

Once the roof frame is securely in place, install your chosen roofing material. Follow the manufacturer's instructions for proper installation, ensuring adequate overlapping to prevent leaks. For corrugated metal sheeting, use appropriate screws to secure the sheets to the frame. For asphalt shingles, follow the recommended layering and nailing patterns. Properly sealing any seams or gaps will prevent water infiltration.

Adding Doors and Windows (Optional)

Depending on your needs and design preferences, you can incorporate doors and windows into your pallet shed. Reclaimed materials can be used for these features, maintaining a cohesive aesthetic. Ensure the doors and windows are securely attached and properly sealed to enhance weather protection.

Sealing and Finishing

Applying a wood preservative and sealant to the exposed wood surfaces of the pallets is highly recommended. This will enhance the durability and weather resistance of the shed, protecting it from rot, insects, and UV damage. Choose a high-quality sealant appropriate for outdoor use. Allow sufficient drying time before using the shed.

Phase 4: Safety Considerations

Safety should always be a primary concern during any DIY project. Observe the following precautions throughout the construction process:

  • Wear appropriate safety gear, including safety glasses, gloves, and sturdy work boots.
  • Use caution when handling power tools. Always follow the manufacturer’s instructions and ensure the tools are in good working order.
  • Work in a well-ventilated area. If using paints or sealants, ensure adequate ventilation to prevent inhaling harmful fumes.
  • Ensure proper disposal of waste materials. Follow local regulations for disposing of wood scraps, nails, and other construction debris.
  • Seek assistance when needed. If any aspect of the project feels beyond your capabilities, do not hesitate to seek help from a more experienced DIY enthusiast or professional.

Constructing a pallet shed is a rewarding project that combines creativity, resourcefulness, and practical skills. By following these detailed plans and prioritizing safety, you can create a durable and aesthetically pleasing storage solution that will serve you well for years to come.

How to Build a Wood Pallet Shed That’s Perfect for Gardeners and Hobbyists


How to Build a Wood Pallet Shed That’s Perfect for Gardeners and Hobbyists

Building Your Dream Pallet Shed: A Gardener's & Hobbyist's Haven

Hey there, fellow gardeners and hobbyists! So, you're dreaming of a dedicated space for all your tools, seeds, and precious projects, right? Building a shed might seem daunting, but I'm here to tell you it's totally doable, even if you're not a seasoned carpenter. And the best part? We're going to build it using reclaimed wood pallets â€" eco-friendly, budget-friendly, and seriously charming!

Planning Your Pallet Shed Paradise

Before we dive into hammering and sawing, let's get organized. Planning is key to a successful project, and a well-planned shed will save you headaches down the line.

Size and Location

First things first: how big do you need your shed to be? Consider what you'll be storing. A small shed for basic tools is different from a larger workshop space for bigger projects. Measure the area where you want to build it, making sure you have enough space for the shed and easy access. Consider sunlight too; you might want a spot that gets a bit of sun for drying things out, but you also want to avoid extreme heat, depending on the items you'll store.

Permitting and Regulations

Check your local regulations! Some areas require building permits for sheds, even small ones. It's better to be safe than sorry and get the necessary permits before you start. This will also ensure your shed complies with local building codes regarding size, height, and materials.

Gathering Your Materials

This is where the fun (and the scavenging!) begins. You'll need a good number of sturdy pallets. Inspect them carefully for rot, damage, and any loose nails or screws. You'll also need:

  • Strong screws (exterior-grade are best)
  • A hammer
  • A drill with various drill bits
  • Measuring tape and level
  • Safety glasses and work gloves
  • A saw (circular saw makes it faster, but a hand saw works too)
  • Post anchors or concrete for the base (optional, but highly recommended)
  • Wood sealant or paint (optional, for weather protection)

You can often find free pallets behind businesses or on Craigslist â€" just make sure you ask permission before taking them!

Building the Foundation: Stable as a Rock

A solid foundation is crucial for a long-lasting shed. You have a few options here:

  • Concrete Slab: The most permanent and stable option, but requires more effort and materials.
  • Gravel Base: A simpler alternative. Level the ground, add a layer of gravel for drainage, and compact it well.
  • Wooden Skids/Pallets: If you're going for a rustic look and your ground is already relatively level, you could use additional pallets as a base. Just ensure they're level and stable.

No matter which option you choose, make sure the base is completely level before you start building the walls.

Constructing the Walls: A Pallet Puzzle

This is where you get to really unleash your creativity! You can build the walls in a variety of ways, depending on the size and design you've planned. Consider these options:

  • Vertical Pallets: This creates a rustic, visually appealing wall. Secure pallets together using screws and reinforce corners with extra bracing.
  • Horizontal Pallets: A more modern look, requiring more pallets but creating a more solid wall.
  • Mixed Orientation: Get creative! Combine vertical and horizontal sections for a unique design.

Important Tip: Before assembling the walls, pre-drill holes for the screws to prevent splitting the wood. Always wear safety glasses!

Roofing Your Pallet Haven

Your roof will protect your precious garden treasures from the elements. A simple gable roof is a great choice for a pallet shed. You'll need to build a frame for the roof using additional wood (or sturdy pallets cut down to size), then cover it with a suitable roofing material. Options include:

  • Tarpaulin: A budget-friendly and waterproof solution.
  • Metal Roofing Sheets: Durable and long-lasting, but can be more expensive.
  • Shingles: A more traditional, aesthetically pleasing option, but can be more time-consuming to install.

Adding the Finishing Touches

Once your walls and roof are complete, it's time for the finishing touches! Consider these details:

  • Door: You'll need a sturdy door. You can use a pre-made door or construct one using pallets. Make sure to secure it well.
  • Windows: Add some windows for ventilation and light. You can use salvaged windows or create simple openings and cover them with plexiglass or chicken wire.
  • Sealing and Painting: Protect your shed from the weather by applying a wood sealant or paint. This will extend its lifespan significantly.
  • Shelving and Organization: Don't forget the inside! Add shelving to organize your tools and supplies.

Commonly Asked Questions

Q: How long does it take to build a pallet shed?

A: That depends on the size and complexity of your shed, as well as your experience. A small, simple shed could take a weekend, while a larger, more elaborate one might take several.

Q: Are pallets safe to use?

A: Yes, but inspect them carefully for any signs of damage, rot, or hazardous materials. Avoid using pallets that have been treated with chemicals.

Q: How do I make the shed more weatherproof?

A: A good quality wood sealant or paint will protect the wood from moisture. Also, ensure your roof is properly sealed and waterproof.

Q: Can I use treated lumber for the frame?

A: Yes, absolutely! Treated lumber is more durable and resistant to rot, making it an excellent choice for the frame, especially if you're using untreated pallets for the walls.

Q: What if I'm not very handy?

A: Don't worry! There are plenty of online resources and tutorials available. Start small, take your time, and don't be afraid to ask for help from friends or family.

Building a pallet shed is a rewarding project. It's a great way to recycle materials, save money, and create a unique space for your gardening and hobby pursuits. So get out there, gather those pallets, and let's get building! Happy shed-building!

Build a Wood Pallet Shed: A Step-by-Step Guide to Easy Construction


Build a Wood Pallet Shed: A Step-by-Step Guide to Easy Construction

Build a Wood Pallet Shed: A Step-by-Step Guide to Easy Construction

This comprehensive guide details the construction of a functional and aesthetically pleasing shed utilizing repurposed wood pallets. While seemingly a simple project, careful planning and execution are crucial for ensuring structural integrity and longevity. This guide assumes a basic understanding of carpentry and the use of common power tools. Always prioritize safety by wearing appropriate personal protective equipment (PPE), including safety glasses, gloves, and hearing protection.

I. Planning and Preparation

Before commencing construction, meticulous planning is paramount. This phase encompasses several critical steps that lay the foundation for a successful project.

A. Site Selection and Preparation

The location of your shed significantly impacts its usability and longevity. Choose a level, well-drained area with sufficient sunlight and access for ease of construction and future maintenance. Clear the chosen site of vegetation, debris, and any potential obstructions. Consider the proximity to existing structures and utilities.

B. Pallet Assessment and Selection

The success of this project hinges on the quality of the pallets employed. Inspect numerous pallets to select those that are structurally sound, free from significant rot, insect infestation, or damage. Prioritize pallets constructed from pressure-treated lumber, which offers superior durability and resistance to decay. Note that the dimensions of the pallets may vary; measure several to determine the overall shed dimensions. Aim for pallets of similar size and quality for consistency.

C. Material Acquisition and Tool Preparation

Beyond the pallets themselves, several additional materials are required. These include:

  • Concrete or gravel for the foundation (depending on chosen foundation type).
  • Pressure-treated lumber for framing, supports, and any necessary repairs or reinforcements to the pallets.
  • Roofing materials (e.g., corrugated metal, asphalt shingles).
  • Nails, screws, and other fasteners.
  • Wood preservative (optional, but recommended for untreated pallets).
  • Exterior paint or stain (optional, for aesthetics and protection).

Ensure all necessary tools are readily available and in good working order. This includes:

  • Hammer
  • Screwdriver (both manual and power)
  • Drill with various drill bits
  • Circular saw or hand saw
  • Measuring tape
  • Level
  • Shovel (for foundation preparation)
  • Safety glasses, gloves, and hearing protection

II. Foundation Construction

A stable foundation is essential for the longevity and structural integrity of the shed. Two primary foundation options are presented here:

A. Concrete Slab Foundation

This provides the most robust and durable base. Excavate the site to a depth appropriate for your local climate and soil conditions. Create a formwork to contain the concrete. Pour and level the concrete, ensuring proper curing time before proceeding with the pallet structure.

B. Gravel Base Foundation

This is a simpler and less expensive option suitable for lighter sheds. Level the ground and lay down a layer of gravel, compacting it thoroughly for stability. This approach is less resistant to shifting ground and may not be suitable for all climates or soil types.

III. Shed Frame Construction

The frame provides the structural skeleton for the shed. This section details the assembly of the pallet walls and roof structure.

A. Wall Assembly

Assess the pallets and determine how best to arrange them to form the walls. You may need to dismantle and reassemble sections of pallets to achieve the desired height and dimensions. Secure the pallets together using screws or nails, reinforcing connections as needed with additional pressure-treated lumber. Consider bracing the walls for additional stability.

B. Floor Construction

If not using the pallets for the floor directly, construct a sturdy floor frame using pressure-treated lumber. This frame should rest securely on the foundation. Plywood or additional pallets can then be affixed to the frame to create a solid floor.

C. Roof Construction

The roof design should consider local weather conditions. A simple gable roof is recommended for its stability and water runoff capabilities. Construct the roof trusses using pressure-treated lumber, ensuring proper bracing for stability. Attach the trusses to the top of the wall structure, creating an appropriately sloped roofline. Consider the weight of your roofing materials when designing the trusses.

IV. Roofing and Finishing

Once the frame is complete, the roofing and finishing touches are applied.

A. Roofing Installation

Install the chosen roofing material according to the manufacturer's instructions. Ensure proper overlap and sealing to prevent leaks. This step requires careful attention to detail to guarantee a waterproof and durable roof.

B. Door and Window Installation (Optional)

If desired, incorporate a door and/or windows. These can be constructed using additional pressure-treated lumber or repurposed materials. Ensure proper sealing and weatherproofing to prevent drafts and moisture ingress.

C. Finishing Touches

Apply a wood preservative and/or exterior paint or stain to protect the wood from the elements and enhance the aesthetics of the shed. This step is crucial for the longevity of your structure.

V. Safety Precautions

Throughout the construction process, prioritize safety. Wear appropriate PPE at all times. Use caution when operating power tools and follow all manufacturer's instructions. Ensure the work area is well-lit and free of obstructions. Consider seeking assistance for heavier lifting or more complex tasks.

Building a wood pallet shed is a rewarding project that combines sustainability with functionality. By carefully following these steps and prioritizing safety, you can construct a durable and aesthetically pleasing shed that will serve you for years to come. Remember to adapt this guide to your specific needs and local conditions.

Create Your Own DIY Pallet Shed with These Simple and Affordable Plans


Create Your Own DIY Pallet Shed with These Simple and Affordable Plans

Build Your Dream Pallet Shed: A DIY Guide

Tired of cluttered garages and overflowing storage spaces? Yearning for a charming, rustic addition to your backyard? Then prepare to unleash your inner builder with this comprehensive guide to crafting your own DIY pallet shed! This project is surprisingly affordable and achievable, even for novice DIYers. We'll walk you through each step, ensuring you build a sturdy and stylish shed you'll be proud of.

Planning Your Pallet Paradise: Before You Begin

Before diving into the construction, careful planning is key. First, determine the desired size and location of your shed. Consider the available space in your yard, local building codes (especially regarding setbacks and permits), and the amount of materials you'll need. Sketch a simple plan, noting the dimensions and features you desire. Next, source your pallets. Look for sturdy pallets made from pressure-treated lumber; inspect them closely for damage before committing. Remember to prioritize safety and always wear appropriate safety gear like gloves and eye protection during the entire project. You'll also need to gather your tools, including a hammer, saw, measuring tape, level, screws, and potentially a drill.

Gathering Your Materials & Tools

Once your plan is set, gather the necessary materials. Besides the pallets, you'll need additional lumber for reinforcing the structure, especially the roof. Consider using pressure-treated wood for longevity, especially for the floor and base. Don't forget the essential hardware: screws (longer ones for structural support, shorter ones for attaching the pallets), nails, hinges, a latch or lock for the door, and possibly weatherproofing sealant. The quantity of each material will depend on your shed's dimensions. To ensure a smooth construction process, prepare your tools beforehand. This includes a hammer, saw (circular saw is recommended for ease of cutting pallets), measuring tape, level, screwdriver or drill with appropriate drill bits, safety glasses, and work gloves.

Essential Tool Checklist:

  • Hammer
  • Saw (circular saw recommended)
  • Measuring Tape
  • Level
  • Screwdriver or Drill
  • Safety Glasses
  • Work Gloves

Construction: Building Your Pallet Shed

Begin by constructing the base of your shed. This could be a simple wooden frame made from new lumber, providing a level and stable foundation. You can then start assembling the pallet walls. This might require some disassembly and re-arrangement of the pallets to achieve the desired height and stability. Secure each pallet firmly to the base and to each other using screws for a strong and lasting structure. Remember to check for level and plumb regularly throughout the construction process. Once the walls are complete, build a frame for the roof using additional lumber. Consider the roof pitch for efficient water runoff. Cover the roof with plywood, corrugated metal sheets, or even more pallets, depending on your budget and aesthetic preference. Finally, add a door (built from pallets or new lumber), hinges, and a latch.

Finishing Touches & Maintenance

Once the shed is structurally complete, apply a weatherproofing sealant to protect the wood from the elements. This will extend the life of your shed and keep your belongings dry. You might also consider painting or staining the shed to match your aesthetic preferences and further protect it from the weather. Finally, organize the interior of your shed, adding shelving or other storage solutions as needed. Regular maintenance, such as inspecting for loose screws or damaged boards, will keep your DIY pallet shed looking great and functional for years to come. Remember to clean out leaves and debris regularly to prevent build-up and water damage.

Building a pallet shed is a rewarding project that allows you to create a unique and functional space while enjoying the satisfaction of a job well done. With careful planning and execution, you can build a beautiful and sturdy structure that will serve you well for years!