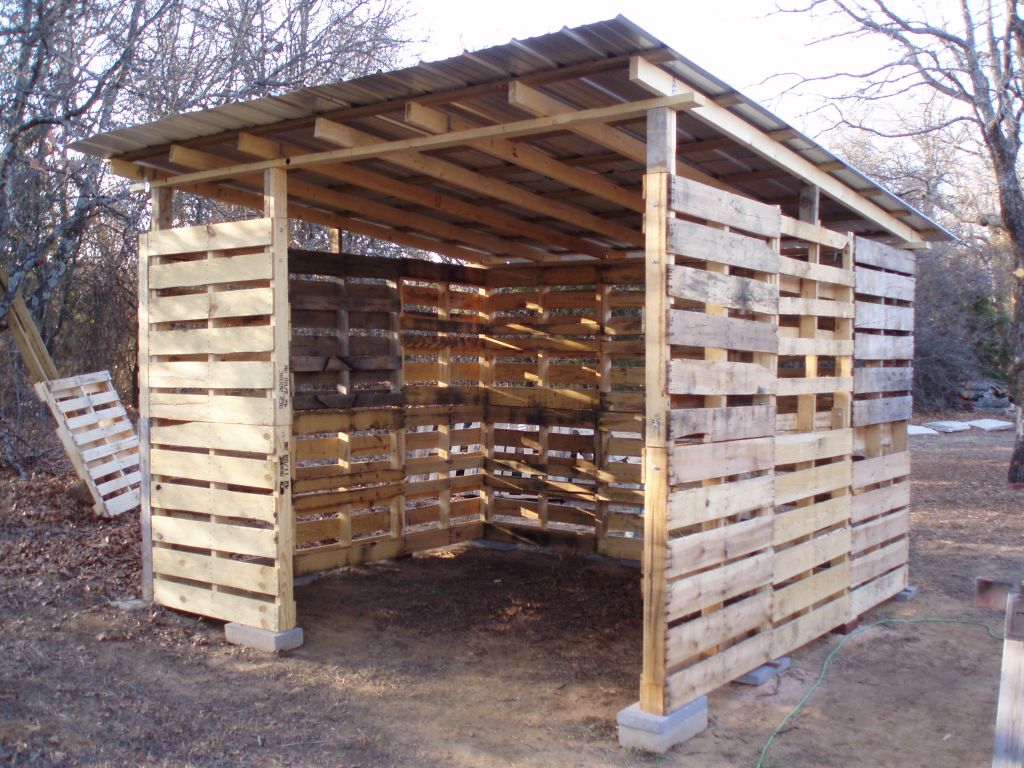
DIY Pallet Shed: Free Plans for Creating a Practical Storage Solution

DIY Pallet Shed: Free Plans for Creating a Practical Storage Solution
The allure of a cost-effective and aesthetically pleasing storage solution is undeniable. Reclaimed materials offer a sustainable and budget-friendly approach to construction, and repurposed pallets stand out as a particularly versatile option. This comprehensive guide provides detailed, free plans for constructing a practical and durable pallet shed, suitable for a range of storage needs. From initial planning to final touches, this guide ensures a successful project, even for novice DIY enthusiasts.
Phase 1: Planning and Preparation
Before embarking on the construction process, meticulous planning is crucial for a streamlined and successful project. This phase encompasses assessing your needs, selecting appropriate materials, and preparing the construction site.
Assessing Your Storage Needs
Begin by defining the purpose of your pallet shed. What will you store inside? The size and design of your shed will be directly influenced by the intended contents. Consider factors such as the volume of items to be stored, their dimensions, and any specific requirements for climate control or protection from the elements. Accurate assessment prevents costly mistakes and ensures the final structure adequately fulfills its purpose.
Material Selection and Acquisition
The foundation of your pallet shed is, of course, the pallets themselves. Source high-quality pallets; avoid those showing significant signs of damage, rot, or infestation. Inspect each pallet carefully for loose nails, broken boards, or structural weaknesses. Aim for pallets constructed from sturdy hardwood, as these offer superior durability and weather resistance. You will also require additional materials, including:
- Foundation Materials: Concrete blocks, gravel, or a prepared level ground.
- Roofing Materials: Corrugated metal sheeting, asphalt shingles, or tar paper, depending on your budget and aesthetic preferences.
- Fasteners: Galvanized nails, screws, and potentially metal strapping for added structural integrity.
- Treatment Materials (Optional): Wood preservative and sealant to enhance the longevity and weather resistance of the pallets.
- Tools: Hammer, saw, drill, level, measuring tape, safety glasses, gloves.
Site Preparation
Choosing the appropriate location for your pallet shed is paramount. Ensure the site is level and provides adequate drainage to prevent water accumulation around the structure. Clear the area of any debris, vegetation, or obstacles that might interfere with construction. The site should also offer convenient access for material delivery and future use of the shed.
Phase 2: Construction of the Pallet Shed Frame
This phase involves assembling the primary structural components of the shed, ensuring a robust and stable foundation for the walls and roof.
Building the Foundation
Constructing a stable foundation is essential for preventing settling and ensuring the longevity of your pallet shed. You have several options: a simple gravel base for well-drained soil, a concrete slab for superior stability, or a foundation built with concrete blocks. The choice depends on your budget, soil conditions, and desired level of permanence.
Erecting the Walls
Using pre-selected and inspected pallets, begin assembling the walls of your shed. Ensure that the pallets are aligned consistently to maintain structural integrity. You may need to cut and adjust certain pallets to fit the desired dimensions of your shed. Secure the pallets together using galvanized nails or screws. Consider adding bracing or support beams to reinforce the structure, particularly if you plan on storing heavier items.
Constructing the Roof Frame
The roof design can vary depending on your preference and the overall design of the shed. A simple gable roof or a shed roof are both viable options. You can use additional lumber to create the roof frame, ensuring adequate support for the chosen roofing material. Properly securing the roof frame to the walls is critical to prevent collapses or damage during inclement weather.
Phase 3: Roofing and Finishing Touches
This phase completes the shed's construction, adding the final layers of protection and aesthetic appeal.
Installing the Roofing Material
Once the roof frame is securely in place, install your chosen roofing material. Follow the manufacturer's instructions for proper installation, ensuring adequate overlapping to prevent leaks. For corrugated metal sheeting, use appropriate screws to secure the sheets to the frame. For asphalt shingles, follow the recommended layering and nailing patterns. Properly sealing any seams or gaps will prevent water infiltration.
Adding Doors and Windows (Optional)
Depending on your needs and design preferences, you can incorporate doors and windows into your pallet shed. Reclaimed materials can be used for these features, maintaining a cohesive aesthetic. Ensure the doors and windows are securely attached and properly sealed to enhance weather protection.
Sealing and Finishing
Applying a wood preservative and sealant to the exposed wood surfaces of the pallets is highly recommended. This will enhance the durability and weather resistance of the shed, protecting it from rot, insects, and UV damage. Choose a high-quality sealant appropriate for outdoor use. Allow sufficient drying time before using the shed.
Phase 4: Safety Considerations
Safety should always be a primary concern during any DIY project. Observe the following precautions throughout the construction process:
- Wear appropriate safety gear, including safety glasses, gloves, and sturdy work boots.
- Use caution when handling power tools. Always follow the manufacturer’s instructions and ensure the tools are in good working order.
- Work in a well-ventilated area. If using paints or sealants, ensure adequate ventilation to prevent inhaling harmful fumes.
- Ensure proper disposal of waste materials. Follow local regulations for disposing of wood scraps, nails, and other construction debris.
- Seek assistance when needed. If any aspect of the project feels beyond your capabilities, do not hesitate to seek help from a more experienced DIY enthusiast or professional.
Constructing a pallet shed is a rewarding project that combines creativity, resourcefulness, and practical skills. By following these detailed plans and prioritizing safety, you can create a durable and aesthetically pleasing storage solution that will serve you well for years to come.


0 comments:
Post a Comment