How to Construct a Pole Barn with a Strong Foundation

Alright, so you're ready to build your own pole barn. That's awesome! A pole barn is a versatile structure, perfect for everything from storing your equipment to hosting family gatherings. But before you start hammering away, let's talk about the most important part: the foundation. A solid foundation is the key to a long-lasting, sturdy pole barn.
First, You Need a Plan:
Before you get your hands dirty, you need a plan. What size barn do you need? What will you use it for? Do you need extra space for a workshop or an apartment? These questions will help you determine the size and layout of your barn. I also recommend checking local building codes. They'll tell you about things like setbacks, height restrictions, and wind load requirements, which are super important for making sure your barn is safe and legal.
Choosing the Right Foundation:
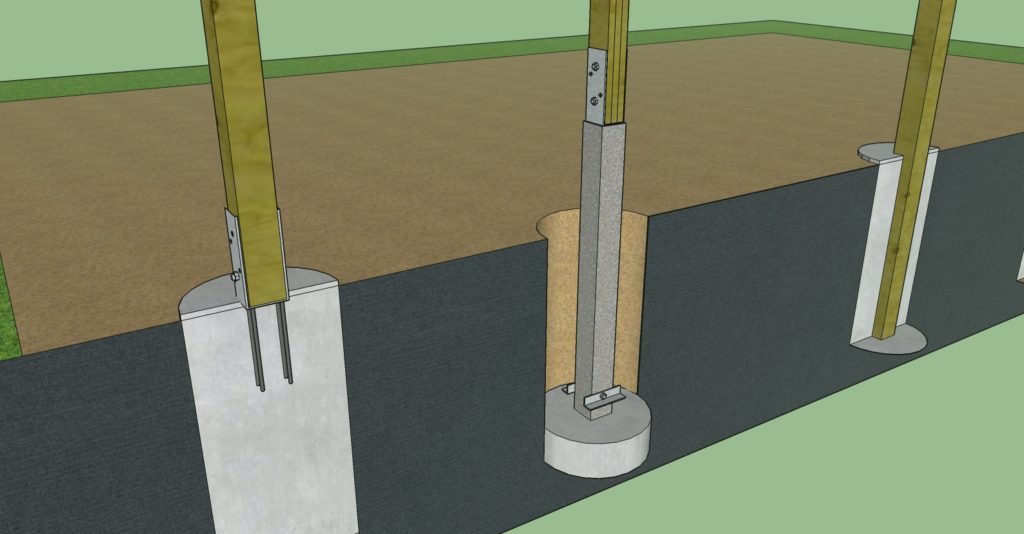
Now, let's talk about the foundation itself. The most common type for pole barns is a concrete pier foundation. Think of it as a bunch of concrete pillars that will support the weight of your barn. Here's why it's a popular choice:
Durable: Concrete is tough and can withstand the test of time, even in harsh weather.
Affordable: Compared to a full slab foundation, concrete piers are generally more budget-friendly.
Easy to Build: You can do it yourself, but don't hesitate to call in a professional if you need help.
Here's how you build a concrete pier foundation:
1. Planning the Layout: You need to know exactly where those piers will go. Use your blueprints to mark the locations, and make sure the piers are spaced according to your plan.
2. Digging the Holes: Grab your shovel or a post-hole digger and get to work. The depth of your holes will depend on your local frost line, the depth where the ground freezes in winter. Make sure to dig deeper than that frost line to prevent heaving and shifting.
3. Installing the Forms: These forms will hold the concrete for your piers. They are usually made of wood or plastic and come in various shapes and sizes. Make sure they're level and plumb, so your piers are nice and straight.
4. Pouring the Concrete: This is the fun part! Pour the concrete into your forms and make sure it's properly compacted. You can use a vibrating tool to help get rid of air bubbles.
5. Curing the Concrete: Leave the concrete to harden and cure for at least 24 hours, and ideally longer, before removing the forms. This gives it time to gain strength.
Building the Barn Walls:
Once the foundation is set, it's time to start building the walls. This is where the "pole" in "pole barn" comes in. You'll be using pressure-treated lumber, usually 6x6 or 8x8, as the vertical support beams for your barn. Here's how it works:
1. Installing the Posts: The posts are placed directly onto the concrete piers. You'll need to drill holes in the posts and use galvanized bolts to secure them to the piers. Make sure those bolts are long enough to reach deep into the concrete, providing a strong anchor.
2. Building the Wall Frames: Connect the posts using horizontal beams, called wall plates. These beams are usually 2x6 or 2x8 lumber. They are bolted to the posts, creating the framework for your barn's walls.
3. Adding Bracing: For extra strength and stability, install bracing between the posts. This is especially important if you live in an area with strong winds. You can use diagonal braces or horizontal purlins to achieve this.
4. Sheathing and Siding: You'll need to add sheathing, like plywood or OSB, to the walls. This will provide a smooth surface for the siding. Choose your favorite siding material, whether it's metal, wood, or vinyl, and install it on top of the sheathing.
Roofing and Finishing Touches:
The roof is the last big step in building your pole barn. Here's how to do it:
1. Trusses or Rafters: Depending on your roof design, you can use pre-made trusses or build your own rafters. Trusses are usually more efficient and faster to install.
2. Sheathing and Roofing: Just like with the walls, you'll need sheathing for the roof to provide a base for the roofing material. Choose a roofing material that suits your climate and budget, like asphalt shingles, metal, or tile.
3. Finishing Touches: Once the roof is on, it's time for the finishing touches. Install doors and windows, add a floor, and paint or stain the walls.
Tips and Tricks for a Successful Pole Barn Build:
Get Help: Don't be afraid to call in a professional if you're not comfortable with certain aspects of the project. There are many contractors who specialize in pole barn construction.
Invest in Quality Materials: Using quality materials, especially for the foundation and posts, will help you avoid problems down the road.
Plan Ahead: Don't rush the process. Take your time to measure, plan, and ensure everything is done correctly.
Be Patient: Building a pole barn takes time and effort. Don't get discouraged if things don't go perfectly. You'll be rewarded with a structure that will last for years to come.
Building a pole barn is a rewarding project that can enhance your property and provide you with a versatile space for years to come. With careful planning and execution, you can create a beautiful and functional barn that you'll enjoy for many years to come!


0 comments:
Post a Comment