Building a Lean-To Shed for Your Garden: Easy and Affordable DIY Plans

Building a Lean-To Shed for Your Garden: Easy and Affordable DIY Plans
Constructing a lean-to shed provides a practical and cost-effective solution for expanding your garden storage or creating a sheltered workspace. This comprehensive guide details the planning, materials, and construction process, enabling even novice DIY enthusiasts to successfully build their own lean-to shed. This project prioritizes affordability and ease of construction, utilizing readily available materials and straightforward techniques.
Phase 1: Planning and Design
Before commencing construction, meticulous planning is crucial to ensure a structurally sound and aesthetically pleasing shed. This involves determining the shed's dimensions, location, and material selection.
1.1 Determining Dimensions and Location
The dimensions of your lean-to shed should be carefully considered based on your storage needs and the available space. Smaller sheds are simpler and cheaper to build, while larger structures require more materials and expertise. Factors to consider include the amount of equipment and supplies to be stored, desired headroom, and the overall aesthetic integration with the existing landscape. Careful measurement of the proposed location against the supporting wall is paramount to ensure a secure and correctly sized structure. The supporting wall must be able to adequately support the weight of the shed.
The location should be chosen based on sunlight exposure, proximity to power sources (if required for electrical outlets), and accessibility. Consider factors like drainage to prevent water accumulation around the shed’s foundation.
1.2 Material Selection
Choosing appropriate materials is pivotal for both the longevity and the budget of your project. Pressure-treated lumber is recommended for its resistance to rot and insect infestation, particularly for the foundation and framing. Consider using recycled or reclaimed lumber where possible to reduce costs and environmental impact. For roofing, asphalt shingles are a cost-effective and readily available option, while corrugated metal roofing provides superior durability but may be slightly more expensive.
Consider these material choices:
- Framing Lumber: Pressure-treated 4x4 posts, 2x4 studs, and 2x6 rafters.
- Sheathing: Plywood or OSB (Oriented Strand Board) for wall and roof cladding.
- Roofing: Asphalt shingles, corrugated metal, or polycarbonate sheets.
- Fasteners: Galvanized nails, screws, and appropriate connectors.
- Foundation: Concrete blocks, gravel, or a concrete slab.
1.3 Obtaining Necessary Permits
Before commencing construction, it is essential to check with your local authorities to ascertain whether any building permits are required for your lean-to shed project. Permit requirements vary depending on location and shed dimensions. Failure to obtain necessary permits can result in fines or necessitate the demolition of the structure.
Phase 2: Construction Process
The construction process is broken down into several key steps, each requiring careful attention to detail for a successful outcome. It is advisable to work with a partner to aid in lifting and positioning materials.
2.1 Foundation Preparation
A stable foundation is crucial for the structural integrity of the shed. The type of foundation will depend on the soil conditions and the shed’s size. For smaller lean-to sheds, a gravel base or concrete blocks may suffice. Larger structures may necessitate a poured concrete slab for optimal support. Level the chosen foundation area thoroughly, ensuring a firm and even surface.
2.2 Framing the Structure
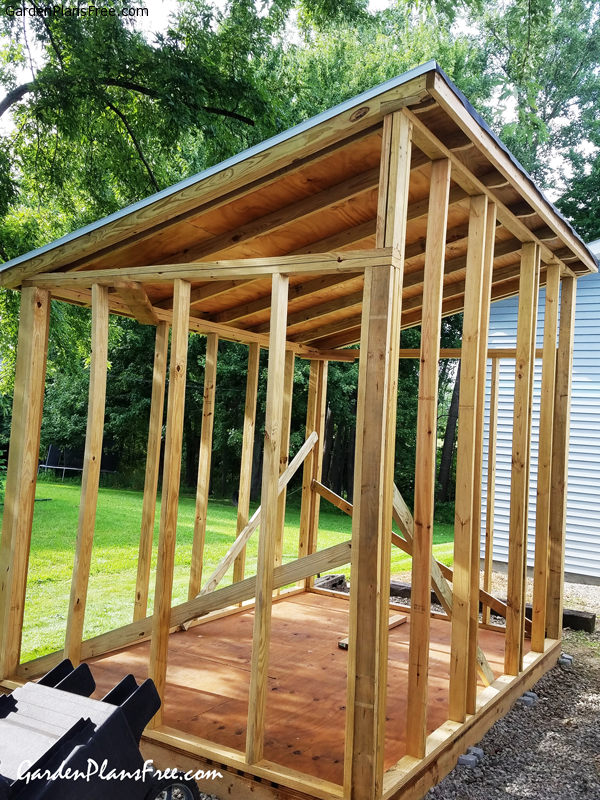
The framing of the lean-to involves constructing the supporting structure against the existing wall. This includes erecting vertical posts, installing horizontal beams, and attaching rafters to create the roofline. Ensure that all framing members are plumb (perfectly vertical) and level, using a spirit level to verify accuracy. Properly spaced studs and rafters are crucial for supporting the sheathing and roofing.
2.3 Sheathing the Walls and Roof
Once the framing is complete, attach the sheathing material to the walls and roof. This provides a surface for the roofing and exterior cladding. Ensure that sheathing is securely fastened and aligned, creating a smooth and even surface. Overlapping the sheathing boards is critical for a weathertight structure.
2.4 Roofing Installation
Roofing installation involves carefully positioning and securing the chosen roofing material. This process involves laying the roofing material according to the manufacturer's instructions, ensuring proper overlap and sealing to prevent leaks. For asphalt shingles, ensure the underlayment is correctly installed before beginning shingle placement. For metal roofing, securing the sheets correctly and using appropriate sealant is critical.
2.5 Finishing Touches
Once the roofing is complete, attend to the finishing touches. This may involve adding a door, installing windows, painting or staining the exterior, and adding gutters for water drainage. Consider adding a simple floor using plywood or concrete.
Phase 3: Safety Considerations
Safety should always be the top priority when undertaking any DIY project. This includes wearing appropriate safety gear, such as safety glasses, gloves, and hearing protection. Using appropriate lifting techniques and avoiding overexertion is also vital. Always ensure that the work area is adequately lit and free from obstructions.
Phase 4: Cost Considerations
Building a lean-to shed can be a significantly more affordable alternative to purchasing a pre-fabricated structure. By utilizing readily available materials and employing efficient construction techniques, the costs can be minimized further. Careful planning and material sourcing, comparing prices from different suppliers, and considering recycled materials can significantly impact the overall budget.
Conclusion
Constructing a lean-to shed offers a rewarding DIY project that enhances garden functionality while providing valuable storage or workspace. By following these detailed plans and prioritizing safety, even novice builders can successfully complete this affordable and practical project. Remember to always consult local building codes and regulations before commencing construction.


0 comments:
Post a Comment